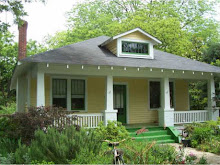
 another view showing the exterior paint on the addition. It seamlessly blends into the old paint about halfway down the side of the house:
In this shot from standing on the deck you can see the old part of the house (back kitchen wall) on the right, and the new construction (master bedroom) on the left. You can't even tell the difference really:

And we have dry wall in the addition! The hardwood flooring is laid too!


Master bathroom door on the left and walk-in closet on the right:

The window in the master bathroom:
 Where the vanity will go:
 Tub alcove:
 view from the other side:
 Below is just a shot of the the master bath floor so you can see a comparison once the tile is laid:
 It's hard to get a good shot of the walk-in closet. This about the best I could get. :P
 A view standing by the master bedroom door looking down the hallway towards the center of the house. The laundry cove is on the right there and the door to the middle bedroom on the left:
Standing in the doorway of the middle bedroom looking across the hall to the laundry:

They sheetrocked over all the ceilings in the house as well. The paint color in the central hub makes it easy to see where they taped and mudded the edges where the new sheetrock ceilings meet the old plaster walls:
 Dunce toilet is in time out. haha. ;)
I know it's not really exciting to look at a bunch of pictures of ceilings, so I won't post every room. But it's exciting to us because of the state the old ceiling were in. If you'll recall these pics from the first post (example 1 & example 2). So anyway, here's just a few shots of the new ceilings...starting with the dining room:

Kitchen ceiling. This picture makes the ceiling appear low, but it's actually 9 ft:

Existing bath....this ceiling used to be pastel green (I can't wait till we can wrangle the rest of the easter egg colors in here too)....

And one last ceiling pic of the living room:
 If you'll recall the living room used to be green, but now it's just gray because they sanded down peeling paint, taped over settling cracks and skim coated mudding over most of the plaster walls in the house. (They'll be painting all the interiors soon, so stay tuned for pictures with all our new colors).
Just a view looking at some construction materials on the floor of the living room, through the dining room, on towards the breakfast nook and the kitchen all the way in the back there:

A view of the other direction from the breakfast nook looking towards the front of the house:


