All of our light fixtures were taken down last week, as the electrician has been rewiring our whole house, eliminating the "knob & tube", replacing the corroded cloth wiring, etc. We will also be dry-walling over the plaster ceilings before they go back up. I took it upon myself to clean all the fixtures, mainly to strip the paint from the canopies. Unknowingly I signed up for a much bigger project. As is turns out, most of the fixtures also had original 1920s cloth wiring that was disintegrating. There were exposed wires all over the place and surely must have been shorting out. I can't believe they even worked.
Here are some shots of the lights as they were. The long chains are the pendant fixtures from the bedrooms, hall and breakfast room.
Close up of the canopies of the pendant fixtures.
This little one is the bathroom sconce. It was totally painted, including the fitter (shade holder).
First things first... I've taken apart lamps before, but never anything quite this old. I did some research on the internet first, looking specifically into antique lighting. One page I found talked about "being careful not to disturb the black paper lining". Oh, you mean than crumbling black powder that dumped everywhere when I opened the socket? More research shows that the old paper socket liners were asbestos. Don't worry, I had on gloves and a mask.
Here is the pan chandelier from the living room. More of the same disintegrating cloth covered wires. Look closely for the electrical tape. classy!
It didn't take too long to open up all the lamps. We have four pendant lamps, one sconce, and two pan chandeliers with four lights each, for a total of 13 sockets. I found a website* where you can buy lamp parts. I'm waiting for my wire and replacement parts to arrive.
At the recommendation of the internet I picked up a can of "Citristrip", a "safer" paint stripper which has less fumes. I used an old plastic storage tub as an impromptu spray booth. I still sprayed it outside because the fake orange smell was too strong.
The Citristrip leaves an orange film on the paint. You can easily see if you missed any spots. I can see this being great for larger items with vertical surfaces (like a door frame) because it is a gel and sticks to the surface without running down like liquid solvents do.
About two hours later the paint is buckled and coming off the brass. Next it's time to scrape it off!
I scraped most of the paint off with a plastic putty knife. Then I moved to the sink and used 0000 steel wool and a wire brush under running water to remove the rest of the paint. A couple of the canopies had more layers of paint than the others so I had to spray them again and soak overnight. The next day the paint came off easily.
As I'd hoped, the canopies were a beautiful patina underneath all the paint. The bathroom fitter is lighter brass- I think it was painted early on before it had a chance to tarnish. I am going to patina it a little darker so it matches it's base. There are only four fitters because one fixture was missing it's original (it had no shade). I ordered a replacement bell shaped fitter (not shown) that is remarkably similar to the originals. It, too, is bright brass and I plan to darken it with the patina solution.
The newly cleaned bathroom sconce. What an improvement!
The other canopies are speckled, but are also beautiful.
Stay tuned for photos of the rewiring process and how they turn out in the end!
*Note: I originally ordered a bunch of lamp parts from www.jalanes.com, but it took three weeks, half my order never arrived, no one ever returned my emails, and they were difficult to get on the phone so I cancelled the order. I ended up ordering from www.grandbrass.com, which turned out to be cheaper too.
Thursday, September 24, 2009
Sunday, September 20, 2009
Kitchen Concept Art
I wanted to see a visual of how we picture our kitchen looking when it's done and given the nature of my job, I figured I might as well just do up a piece of concept art. That way we could make sure we liked what we had planned in our head before we pulled the trigger and also have something to give to our contractor and say "here, make this." :) The perspective is a bit wonky in places, but it gets the point across and I think we are pretty happy with the direction.
Here's what it looks like right now, with all the old cabinets torn off the walls:And here's what it looked like before:Oh, and I also created the space in SketchUp, which is a 3D modeling program from Google that allows you to build things to scale so all the measurements are accurate. Here's a couple shots from different angles:
Monday, September 14, 2009
A journey of a thousand miles must begin with a single step…
Some time in March of this year we were sitting on the couch talking about the first-time home buyer’s tax credit and we started tossing around the idea of buying a house. Ben kindly pointed out that with our extreme pickiness it could possibly take us a long time to find a house we liked enough to buy. Besides we didn’t have to pull the trigger if it wasn’t feeling right, so it couldn’t hurt to start looking.
He was right. We looked for months and went to about 40 house without finding anything we liked… not until we came across the neglected little yellow house that begged to be saved. So here we are, ready to embark on an ambitious renovation/construction project for our very first home. Are we crazy? Possibly, but we like to think of it as passionate about our home space. ;)
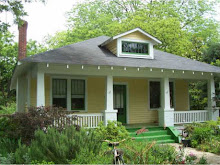
Our house is a cozy 1926 craftsman style bungalow in Raleigh , NC . It has had very little updating and it needs some love. It has original knob and tube wiring, galvanized plumbing, no insulation, cracked plaster ceilings (and walls), among other things. We love the 1920s era of architecture and it still retains its original charm having not been heavily renovated to look like a new house.
We decided to give it the attention it deserves and spruce it up, as well as add some square footage to the cozy footprint, while trying to retain the character of the house. We will be updating all the electrical, plumbing, insulation, repairing the ceilings/walls, refinishing the floors, redoing the kitchen, and adding a master suite on the back. We’ll be working under the guidelines of the historic preservation office and hopefully score a nice state tax credit when it’s all said and done.
We’ve spent the last couple months getting our preliminary plans together and our contractor kicked off the project last week by ripping out the old 80’s melamine kitchen cabinets (stay tuned for pictures). We set up this blog to share our experience with you as we renovate the house and build the addition. Please feel free check back often. We’ll try to update fairly frequently with our trials, tribulations, and hopefully successes. :)
-Ben & Kate
Now onto the pics:
This is where we are going to add the master suite on the back. The white porch area you see with the grating is going to be removed to make way for the addition.
The deck is going to be built off the back of the kitchen here. Kate and her mom did a lot of hard labor on the yard already, which included moving those plants you see in the picture out of the way:
Lean-to shed:
Living room:
Most of the ceilings and walls are cracked and peeling like this and are going to be repaired:
The house still has awesome original light fixtures:
Dining room:
This shows the linen closet that is going to be shifted up so we can move the hvac grate off the floor onto the wall there:
The entire bathroom is painted lavender and yellow including the bathtub, which looks like a big easter egg.....that's gotta change. We are also going to add bead-board wainscoting in here:
Bedroom. you can see some more of the peeling paint action there:
You can see the big floor grate we're going to move and patch in with hardwood.
Some shots of the floors. needless to say they need to be refinished:
Looking towards the kitchen from the dining room:
Stove stays, cabinets & counters go:
The 80's melamine cabinets are going bye bye:
You can see the nook where the fridge used to be. We are putting cabinets and countertops there and have moved the fridge to the other corner:
This is currently the back door, but will become an open passageway to the new hall when the addition is constructed.
The ceiling is caving in a few spots. We are going to sheetrock over the plaster ceilings in the whole house:
Back porch where the previous owner had the washer & dryer. This will become part of the new hallway:
phew, got that first post out of the way. Check back for updates!
Labels:
bathroom,
bedroom,
before,
dining room,
exterior,
interior,
kitchen,
living room
Subscribe to:
Posts (Atom)