
Check out our awesome new built-in bookcase and window seat in our new master bedroom:
 The back surfaces of the bookcases are beadboard paneled and since you couldn't really see it in the previous picture, I threw in the pic below. They still need to build the cabinet doors and drawers for the bottom, but they are working on that right now.
French doors with trim. They still need to be painted brown to match the other doors in the house and there will be a dummy knob on the other door, as well as old fashion surface bolts.

Again, it's hard to get pictures of the walk-in closet, but you can kinda see the rod and shelf setup we have going on:

A view from inside the closet looking out into the bedroom:

They started building the vanity and installed the custom made medicine cabinets that match our window trim. I was able to find someone on the internet that made the medicine cabinets exactly to my specs for much cheaper than it would cost buy premade similar medicine cabinets from a store.
There is still plenty more things to be done in here, but it's exciting to see the rough in.

They put up the subway tile in the master shower (still needs grout)...and also installed the beadboard wainscoting around the walls. (this picture was taken before they started building the vanity).

A shot looking the other direction of the tile in the shower and trim work around the door. We scored the doors for the master bathroom and closet on the cheap from habitat for humanity's salvage shop. They will be painted brown to match the rest of the doors in the house. Another bonus to getting actual vintage doors rather than replicas is that they were already set up for old fashion mortise locks! I bought some old doorknobs, backplates and mortise locks that match all the rest of the ones in the house on craigslist for cheap too!

Here's where the master throne will go...

The back end of the hallway with the old backdoor we reused and the beautiful antique transom window I found from an antique shop online. All the glass in the door and transom really help bring light into the hallway. The wood flooring still needs to be laid at this end of the hallway.

The new double doors we added to the laundry cove...These are the only brand new doors we got for the entire project! The antique doorknobs we got at a great store in Durham that has tons of salvaged home parts from old houses. Unfortunately they went out of business, but we were able to take advantage of their going out of business sale when buying these knobs.

A pic with the double doors swung open. Our stacked washer and dryer will go in here. There is not much room for anything else, but we crammed a few small shelves on the right side there for detergent, dryer sheets, etc.

Here is our redone linen closet/built-in cabinet. I designed it to incorporate the hvac return that we are moving from the floor there in front of it. Still needs some more shelves and doors built. The walls also haven't been painted the right color in here yet.

The existing bath that we added beadboard wainscoting to and also repainted with this soothing white and green palette. If you'll recall the easter egg colors it used to be painted, this is much nicer. The tub is still purple and yellow, but it will be painted white soon.
 medicine cabinet side, where we are installing a pedestal sink:
Here is the living room painted a nice mellow yellow shade. ;)

We went with a semi-rich tint for the dining room. Since a dining room is a bit more formal of a space, we thought this medium tone brown/tan would be elegant, without being too overpowering.

And the kitchen is being built as we speak. This first picture show a sweet antique built-in cabinet the fits perfectly in that space. Kate stripped the old peeling paint off it, so we can either do a wash of paint or a solid repaint. It's not totally decided yet.
 Stove side with a lazy susan in the corner base cabinet:
 The upper cabinets will have glass doors on the large sections. We also really want to make the cabinets feel more like part of the room than just a box tacked on the wall. So we designed them to be closed soffit, going all the way to the ceiling. We added crown molding around the perimeter of the kitchen to help tie in the cabinets more as well.
 Standing in the pantry taking this picture:
 Our electrical service is being upgraded. Yay for meeting safety code!
Below is a pile of junk we found scattered throughout the yard. There was actually way more than this but it already made it to the dumpster before I took this photo.

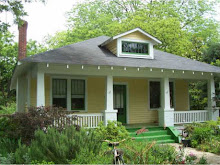
Just the back of the house again. Not much has changed here since the last post, except for the back door being added, the trees loosing their leaves and the pile of junk at the bottom of the stairs.

We're in the home stretch, so check back for photos of the finished product! :D


